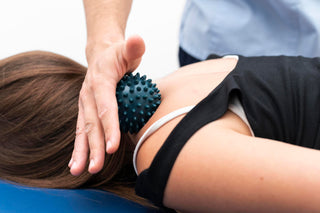
Myofascial release is a form of manual therapy that focuses on the manipulation of the fascia, a connective tissue that surrounds and supports muscles, bones, and organs throughout the body. The goal of myofascial release is to alleviate pain, improve mobility, and restore function by addressing restrictions or adhesions within the fascia that may be causing discomfort or limiting movement.
During a myofascial release session, a therapist applies gentle pressure and sustained stretching techniques to the fascia, targeting areas of tension or tightness. This helps to elongate and soften the fascia, releasing restrictions and allowing for improved movement and flexibility. Myofascial release can be performed using various techniques, including direct pressure, stretching, or foam rolling, depending on the individual's needs and preferences.
Myofascial release is commonly used to treat a variety of musculoskeletal conditions, including chronic pain, muscle stiffness, joint immobility, and postural imbalances. It can also be beneficial for athletes looking to enhance performance, individuals recovering from injuries or surgeries, and those seeking relief from stress or tension-related symptoms.
Overall, myofascial release therapy aims to promote overall health and well-being by restoring balance and alignment within the body's fascial system, leading to improved movement, reduced pain, and enhanced quality of life.
What Equipment do I need to do Myofascial Release myself?
To perform myofascial release therapy on yourself, you'll need a few basic tools and accessories to effectively target areas of tension and discomfort. Here's what you'll need:
1. Foam Roller: A foam roller is a cylindrical-shaped tool made of dense foam that is used to apply pressure to muscles and fascia, helping to release tension and improve mobility. Choose a foam roller with a moderate density, as softer rollers may not provide enough pressure, while firmer ones may be too intense for beginners.
2. Massage Ball: Massage balls come in various sizes and densities and are designed to target specific areas of tension, such as the shoulders, back, or feet. Choose a massage ball with a texture or surface that provides enough grip to effectively release tight muscles and fascia.
3. Yoga Mat or Exercise Mat: A yoga mat or exercise mat provides a comfortable and supportive surface for performing myofascial release exercises and stretches. It also helps prevent slipping and sliding during foam rolling sessions.
4. Towel or Yoga Strap: A towel or yoga strap can be used to assist with stretching and mobility exercises, particularly if you have limited flexibility or range of motion. Use the towel or strap to gently pull and deepen the stretch in targeted muscle groups.
5. Water Bottle or Hydration: Hydration is essential before and after myofascial release therapy to support tissue health and recovery. Keep a water bottle nearby to stay hydrated and replenish fluids lost during the session.
6. Comfortable Clothing: Wear loose, comfortable clothing that allows for freedom of movement during myofascial release exercises. This ensures that you can perform stretches and foam rolling techniques effectively without restriction.
7. Educational Resources: Familiarise yourself with proper techniques and exercises for myofascial release by consulting reputable resources such as books, online tutorials, or instructional videos. This will help you understand how to safely and effectively perform self-myofascial release therapy at home. Check out John Gibbons Youtube page to learn some tips and tricks.
With these basic tools and accessories, you can create an effective self-myofascial release routine to address tension, discomfort, and restricted mobility in various areas of your body. Remember to listen to your body and adjust the intensity and duration of your myofascial release sessions based on your individual needs and comfort level.
How do I do SMR myself?
Performing myofascial release involves applying gentle pressure and stretching techniques to specific areas of the body to release tension and tightness in the fascia.
Fascia is a sheet or band of connective tissue beneath the skin that attaches, stabilizes, encloses, and separates muscles. It also surrounds internal organs to keep them separate. Like ligaments and tendons, fascia is made up of fibrous connective tissue containing closely packed bundles of collagen fibres oriented in a wavy pattern parallel to the direction of pull. Fascia is consequently flexible and able to resist great unidirectional tension forces.
Fascia becomes important clinically when it loses stiffness or becomes too stiff or has decreased shearing ability. When inflammatory fasciitis or trauma causes fibrosis and adhesions, fascial tissue fails to differentiate the adjacent structures resulting in a loss of muscle performance.
Self myofascial release (SMR) technique is a form of stretching utilizing the concept of autogenic inhibition to improve soft tissue extensibility. This relaxing of the muscle/fascia helps to restore the normal hyaluronic acid viscosity. This helps to correct the positional relationship between adjacent tissue, which also aids the restoration of normal proprioceptive function to the injured area.
This technique can be effective for many muscles
- gastrocnemius (calf)
- latissimus dorsi (under the arm to the spine)
- piriformis (hip to spine)
- adductors
- quadriceps (thigh)
- hamstrings
- hip flexors
- thoracic spine
SMR is accomplished by rolling the Sissel Fascia roller under each muscle group until a tender area is found, and maintaining pressure on the tender areas (known as trigger points) for 30 to 60 seconds
Here's a step-by-step guide on how to do myofascial release:
1. Warm-Up: Before starting myofascial release, it's essential to warm up your muscles and fascia to prepare them for therapy. Perform light aerobic exercises, such as walking, jogging, or cycling, for 5-10 minutes to increase blood flow and circulation to the tissues.
2. Identify Problem Areas: Identify areas of tension, tightness, or discomfort in your body that you want to target with myofascial release. Common areas include the neck, shoulders, upper back, lower back, hips, thighs, and calves.
3. Choose Your Tool: Select a myofascial release tool such as a foam roller, massage ball, or massage stick, depending on the area you want to target and your personal preference. Foam rollers are ideal for larger muscle groups, while massage balls are better for smaller, more specific areas.
4. Apply Pressure: Position yourself on the floor or against a wall and place the myofascial release tool under the targeted area of your body. Apply gentle pressure to the tool by leaning into it or using your body weight to sink into the pressure. Start with light pressure and gradually increase as tolerated.
5. Roll or Hold: For foam rolling, slowly roll the tool back and forth along the length of the muscle or fascial plane, pausing on any tender or tight spots (trigger points) for 20-30 seconds. For massage balls or sticks, you can apply pressure by leaning or pressing directly onto the targeted area and holding for the same duration.
6. Breathe and Relax: As you apply pressure to the targeted area, focus on deep, diaphragmatic breathing to help relax the muscles and release tension in the fascia. Try to maintain a relaxed and calm state throughout the myofascial release session.
7. Move Through Range of Motion: After applying pressure to a specific spot, you can also perform gentle movements or stretches to further release tension and improve mobility in the area. Experiment with different movements such as arm circles, shoulder shrugs, or hip rotations to explore different angles and ranges of motion.
8. Repeat as Needed: Continue to perform myofascial release techniques on each problem area for 1-2 minutes or until you feel a noticeable release in tension and tightness. You can repeat the process as needed, focusing on different areas of the body or spending more time on areas that require extra attention.
9. Cool Down: After completing myofascial release, take a few moments to rest and allow your body to integrate the benefits of the therapy. Drink plenty of water to stay hydrated and support tissue recovery.
By following these steps and incorporating myofascial release into your regular self-care routine, you can effectively reduce tension, improve flexibility, and promote overall well-being in your muscles and fascia.